
Add New Layer
Select File → New Layer from the menu.
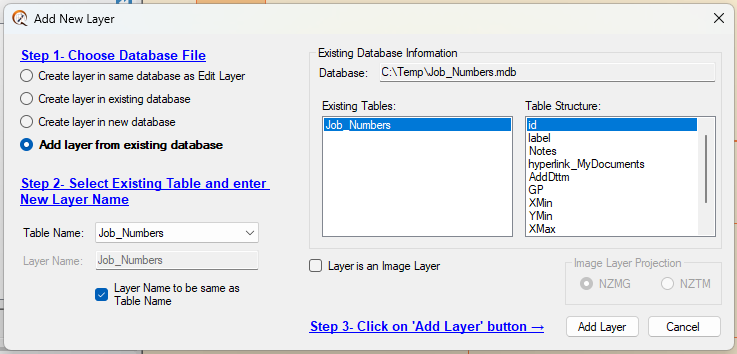
Completing Steps 1 to 3 in the Add New Layer form will create a new layer in Quickmap. If the layer is required for adding images, tick the “Layer is an Image Layer” checkbox.
Options under Step 1
- Create layer in same database as Edit Layer – creates a new layer in Custom.mdb
- Create layer in existing database – opens your existing database file to create a new table and layer
- Create layer in new database – opens a new database to create the new layer
- Add layer from existing database – allows you to select the Database/Table from which to create a new layer
You can also create a new layer from an existing database using the Import Wizard.
Layer Properties
The Layer Properties enable you to set the properties for your new layer.
To change the properties of any map layer, right-click on the layer and select Properties.
- Draw Scale – set the default scale at which your layer is visible. If you never want the layer to turn on automatically, leave the settings at Do not show over a scale of 1:2 and under a scale of 1:1.
- Draw Order – set the layer’s draw order. The higher the number, the higher the layer draws relative to others.
- Layer Group – assign the layer to an existing group or create a New Group by ticking the box and entering a name.
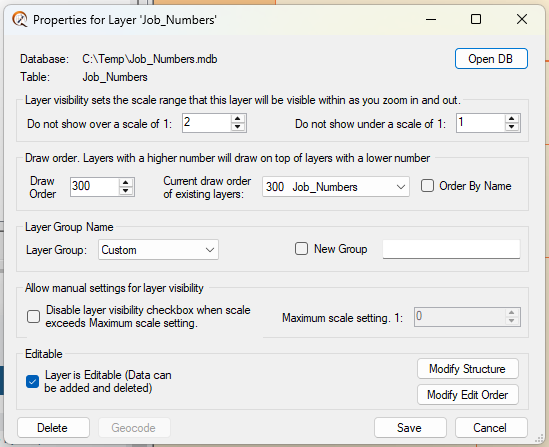
Once the properties are set, click Save.
Modify Structure or Edit Order
Right-click a layer and select Layer Properties. Click the Modify Structure button and then click Add Field.
- Type the Field Name
- Set the Field Type
- Set the Size then click Apply
Custom Searches
Tick the box to enable the field to be searched in the Find dropdown menu, and complete the Prompts.
To allow editing of this new field, tick the Editable Field checkbox and click Apply.
See how to change the Attribute Information.
Next, see how to add single data points into your custom layers: Add and Search Job Numbers or Data.